Automating the Metadata proces
We started creating metadata for the library in a spreadsheet for a couple of reasons:
- Filenames and Metadata should be structured, consistent and without typo’s/errors.
- We wanted to create a small database that is flexible, manageable and easy to expand.
- A spreadsheet exports easily to sound archive apps like soundminer.
We work and live in different cities so we decided to work in a networked hosted spreadsheet with Google Docs.
Any other ‘cloud’ platform would have sufficed, but this was available at that moment. We are currently testing
Synology Office, but it still misses a few handy features.
Structure:
As we explained in our earlier post we had a clear idea about how the filenames should be structured.
Here’s on overview of the filename in the spreadsheet.

We used columns with: editable cells (A to I) and fixed (non editable) cells.
What is great about using a spreadsheet is that you can use references to cells to fill other cells (more on that below).
So for example you can use the terms and information from cells A to I as input for a filename.
Or re-use parts of it for a description or keyword (etc.).
So how do you use the references to create a filename? All the cells are stitched together with the CONCATENATE
function (CONC), as in the example below.

The yellow cell is the CONC function that creates our filename. It’s rather long and not very comprehensive,
but it’s not difficult to create or manage. The function is simply a list of references to the cells A-I which are
intertwined with recurring cells that contain separator symbols, for example the separator symbol ‘[‘ ‘,’or ‘ ‘.
Yes, you’re not wrong, that’s an empty space in quotes. The reason we use these ‘space’ cells is that CONC simply
stitches everything together. Not using spaces would result in an incomprehensible mess that looks like this:
GoodBikeOnboardAsphaltSlowStart-ride-stopFrontMic[Fixedmonomic,supercardioid]F&TBicycleEXT2x
It’s a little bit crude, but once you create a proper CONC function, it’s a matter of copy and paste. Oh and if you’re
wondering what the $-signs do: in this case they are used to fix a reference to a specific column. You can also use
two $ symbols instead of one to refer to a fixed cell (handy for a separator)-it makes the reference absolute.
The great thing is, if you copy/paste or drag the function to another cell, it won’t refer to a wrong cell. Read more
about using $ signs here.
To be clear, what you see displayed in the cell is the result of the CONC function. Or better said the text is not
a string of letters, but a stitched combination of the words in the referred cells. To get the actual string/text,
we can copy and ‘Paste as value’ (with a right click).

Consistency:
Nobody likes inconsistent filenames, keywords and descriptions in a database. And I personally hate to type
things all over again.. all the time. To circumvent this we used a very handy feature of any spreadsheet:
‘Auto-complete’. It’s a simple feature you probably know from any text editing environment on any device,
best explained with an example.
How does it work? Simply fill a set of cells with words and as soon as you start typing it queries that range of cells
(everything above the current cell). By creating a range of cells with our most common terms we’ve created a sort
of lookup table! An example of such a list is our bike names: GoodBike, BadBike, UglyBike, RacerBike, etc.

There is one little caveat in this system*, when you have a blank cell in your column, it will break the system.
(*both Excel and Google Docs)
Another advantage of using Autocomplete is that you can’t make a spelling mistake or typo.
Unless you did it in the beginning while creating the list :)
Expanding and updating:
We can update our lookup table easily, by adding a row and a new term. Changing a term is also easy, however
it obviously doesn’t automatically change the terms in the cells underneath. So this is where ‘search and replace’
comes into play.
We use the same system of creating filenames and metadata fields for our upcoming libraries.
They use different terminology (it’s different type of library), but the modular approach is still useful.
Filenames and embedding metadata:
While working on the sounds of the library we used simple filenames, just long enough to be able to tell them
apart. Some examples: goodbikefront1, goodbikepedal1,goodbikerear1, etc.
After getting all the filenames and metadata into our spreadsheet/ database we could export the fields by copy
pasting (as value) to a new MASTER spreadsheet. This MASTERsheet is pre-formatted for Soundminer (etc).
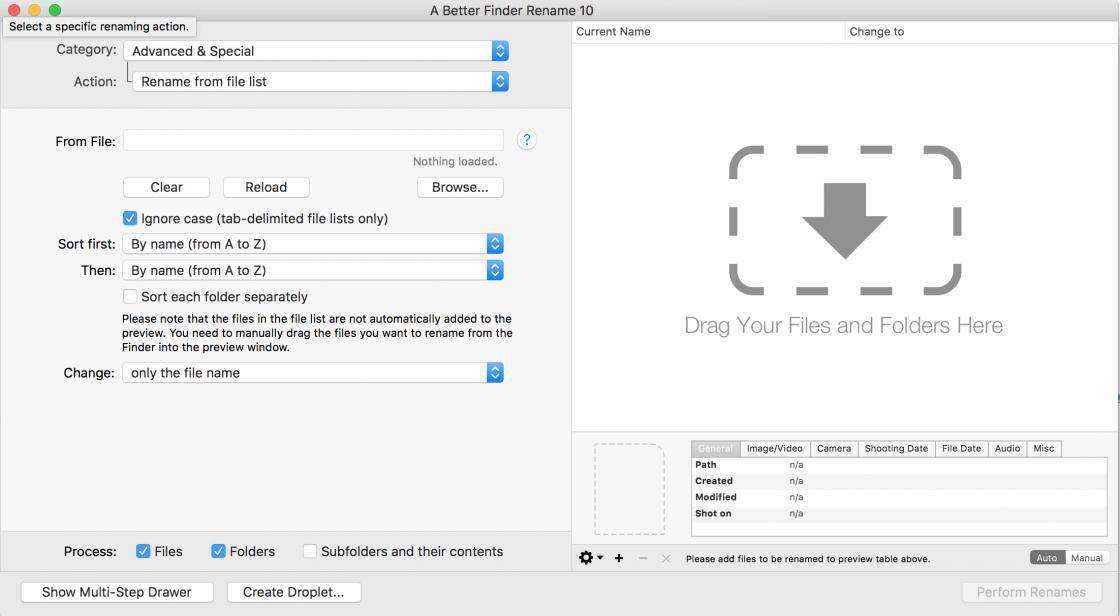
The filenames from MASTERsheet are then used to rename the original files with the application
“A Better Finder Rename’ which conveniently has a ‘Rename from file list’ feature. Import the list and link
the files, press 'Perform Renames'.. Presto.
After that it’s a matter of importing all the files and the MASTERsheet into Soundminer for embedding.
You can find out how that works here. When all that is finished and everything is okay, we export the metadata
to FINALsheet to provide with the sounds, so users can look at the metadata and change it to their liking.
That is particularly easy, because now all the terms in the metadata are consistent.
If you have any questions/opinions regarding this, we’re happy to discuss it!
- 20 September 2023 Webshop Offline
- 17 February 2023 New Release: China Ambiences 1
- 29 January 2023 Updated Eula
- 20 August 2018 Ski Slopes
- 20 August 2018 Location location location
Please try again another time!